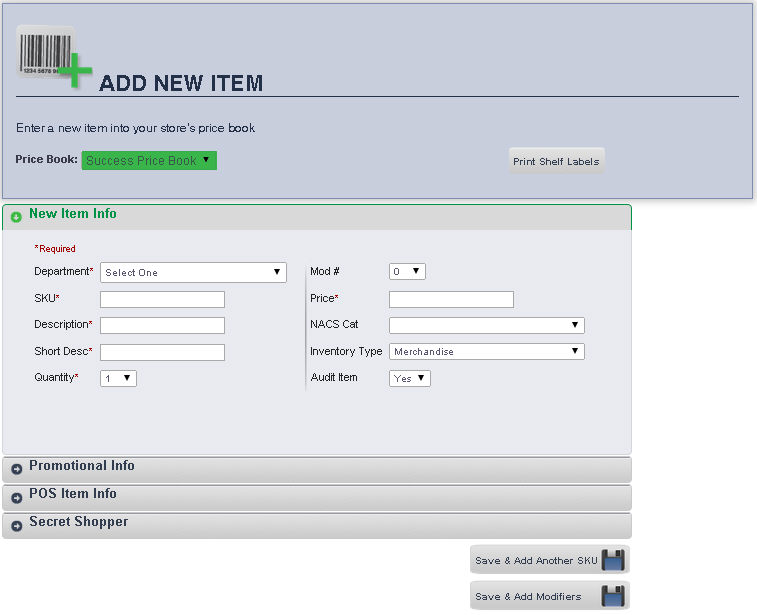
The Add SKU/PLU screen allows you to add a new item to your price book.
From the Price Book drop down menu, select the Price Book you wish to add the new item to.
On the ITEM section, you will need to fill out all the required fields, marked with an asterisk (*)
From the Department drop down menu, select the Department you wish to add the new item to.
Enter the entire UPC/SKU on the package of the item you wish to add into the SKU: text box.
For items already in the ePB database, a Description will appear. You can change this manually in the text box. For items not in the ePB database, you will need to enter your own product description.
For items already in the ePB database, a Short Description will appear. You can change this manually in the text box. For items not in the ePB database,you will need to enter your own product short description.
From the drop down menu, select the Quantity of the item sold that corresponds to the price you'll enter in the Price text box below.
For the default package size, ensure that the Modifier Number is set to 0. You can add new Modifiers to an Item by clicking on the "Save and Add Modifiers" button located at the bottom of the screen.
You must enter the Price you wish to sell the item you are adding to your price book in the Price text box.
If you would like ePB to have complete detail of the item you are adding to the Price Book, select the National Association for Convenience Stores category for the item from the drop down menu. This selection is not required.
From the Inventory Type drop down menu, select the appropriate type of item. By default the Inventory Type is set to Merchandise
If you would like ePB to check the Inventory of the item after each shift, select Yes from the Audit Item drop down menu.
On the PROMOTIONAL section, you will add information related to when the item will start selling at the store as well as the item cost
1 Using the Effective Date text box, or the calendar tool located to the right of the text box, enter the date you wish the item to be added to the price book.
2 Using the Effective Time text box, or the arrows located to the right of the text box, enter the time on the date you selected above you wish the item to be added to the price book.
3 If you would like ePB to have complete detail of the item you are adding to the Price Book so you can utilize all of the program's features, enter the Vendor Cost and MSRP into their corresponding texts boxes. These entries are not required.
4 If you have entered the Vendor Cost, the system will calculate Markup and Margin on that item
On the POS ITEM INFO section, you will enter the item information that your POS needs to have in order to sell the item at the store
1 If the item has a bottle deposit, choose the appropriate selection from the Bottle Deposit Number drop down menu.
2 If the item is eligible to be part of a future promotion, select Yes from the Article in Promotion drop down menu. If it is not, ensure that the drop down box is set to no.
3 If the item you are adding may be sold, ensure that the Article May be Sold drop down menu is set to Yes.
4 If the item may be returned to your store, ensure that the Article May be returned drop down menu is set to Yes.
5 If the sale of the item is subject to Blue Laws, set the Blue Law 1 Applies, and Blue Law 2 Applies drop down menus to the appropriate settings. (You can find out you Point of Sale specific Blue Law settings through the manufacturer of your Point of Sale system.)
On the SECRET SHOPPER section, if the item exists and has an image on our database, the system will display it on this section
frmAddSKUNew.aspx